
🦷 COMPLETE BRUSHING GUIDE
How to Brush Teeth With an Electric Toothbrush: Step-by-Step Guide
Most adults who want to learn how to brush teeth with an electric toothbrush correctly are surprised to discover that technique matters as much as the brush itself. Furthermore, the single most common mistake is using an electric toothbrush exactly like a manual one — scrubbing back and forth — which cancels out the mechanical advantage the device provides. Consequently, applying the correct angle, pressure, and motion turns a basic $28 sonic brush into a clinically effective cleaning tool.
According to the American Dental Association, brushing for a full two minutes twice daily with the correct pressure is the minimum standard for adequate plaque removal in adults — and the built-in timer on most electric toothbrushes is specifically designed to enforce this. Moreover, this guide covers every element of the correct electric toothbrush technique for adults: angle, pressure, timing, surface sequence, brush head care, and how to clean and store your brush properly. For a full comparison of electric toothbrush types, see our Best Electric Toothbrush for Adults Guide.
📅 Last Updated: January 2026 ✅ Dentist-Approved Technique ⏱ 13 Min Read
Affiliate Disclosure: As an Amazon Associate, Syed Shoppe earns from qualifying purchases made through links on this site — at no extra cost to you. Read Full Affiliate Disclosure
What You Will Find In This Guide
Why Learning How to Brush Teeth With an Electric Toothbrush Correctly Matters
When learning how to brush teeth with an electric toothbrush, proper technique matters just as much as the device itself. In fact, research found that adults who used an electric toothbrush incorrectly saw no significant improvement in plaque removal. Therefore, better oral hygiene depends on technique, not the brush alone.
Moreover, common mistakes include pressing too hard, moving the brush too quickly, and not pausing long enough on each tooth. Fortunately, these errors are easy to fix and can lead to cleaner teeth and healthier gums within weeks.
Furthermore, the learning curve is short. Most adults master how to brush teeth with an electric toothbrush within just a few days once they understand the basic principles covered in this guide.
How to Brush Teeth With an Electric Toothbrush - Three Technique Mistakes
Fix these first before anything else. Furthermore, all three corrections take under one minute to learn and cost nothing.
Mistake 1 — Scrubbing Back and Forth
An electric toothbrush is designed to be guided, not scrubbed. Furthermore, the motor generates thousands of vibrations or rotations per minute — all the mechanical cleaning motion you need. Consequently, scrubbing back and forth with the handle adds no extra cleaning power and forces the bristles out of their optimal contact angle.
Mistake 2 — Too Much Pressure
The ideal brushing pressure is approximately 150 grams — the weight of a resting orange. Furthermore, most adults apply 200 to 400 grams without realising it. Moreover, electric toothbrushes multiply the damaging effect because the mechanical motion grinds bristles against gum tissue thousands of times per second. Consequently, over months, this is the leading cause of gum recession.
Mistake 3 — Moving Too Fast
Moving the brush head quickly across multiple teeth at once prevents the bristles from dwelling on each surface long enough to break up plaque. Furthermore, oscillating heads (Oral-B) need approximately 3 seconds per tooth surface.
Additionally, sonic heads need similar dwell time for the fluid dynamics effect to clean beyond the bristle tips. Consequently, 3 seconds per tooth across a full mouth is why the 2-minute timer is correct.How to Brush Teeth With an Electric Toothbrush: The Complete 8-Step Method
Follow these steps in order every brushing session. Furthermore, the sequence is specifically designed so each step sets up the next for optimal cleaning results.
- Place a pea-sized amount of fluoride toothpaste onto the dry brush head. Do not wet the bristles first, as moisture dilutes the toothpaste before it can foam across all tooth surfaces
- Position the brush head against your teeth before switching the motor on. Turning it on in mid-air wastes the initial vibration burst and splashes toothpaste
- Angle the bristles at 45 degrees to your gum line. This directs the mechanical cleaning action toward the gap between tooth and gum where plaque accumulates and gingivitis begins
- Guide the brush head slowly across one to two teeth at a time, spending approximately 3 seconds on each tooth surface. The motor does the cleaning; your job is to position and guide
- Apply only the lightest pressure — approximately 150 grams, which feels like resting a single finger on the brush handle. Overbrushing is the number one cause of gum recession in adults
- Cover every surface of every tooth: the outer face facing the cheek, the inner face facing the tongue, and the chewing surface on top. Most adults habitually skip the lower front inner surfaces
- Follow the 2-minute built-in timer and switch quadrant with each 30-second alert: upper right, upper left, lower right, lower left. This ensures perfectly even brushing time across all four sections
- Spit out excess toothpaste foam when the timer ends. Do not rinse your mouth immediately after brushing, as leaving fluoride in contact with your teeth for 30 seconds improves enamel protection
Brush Method
How to Brush Teeth with an Electric Tooth Brush - Correct Angle and Pressure
Angle and pressure are the two most misunderstood elements of electric toothbrush technique. Furthermore they are the two variables that determine whether your brush is protecting or damaging your gum tissue over time. Consequently, mastering both requires understanding why they matter mechanically, not just following a rule.
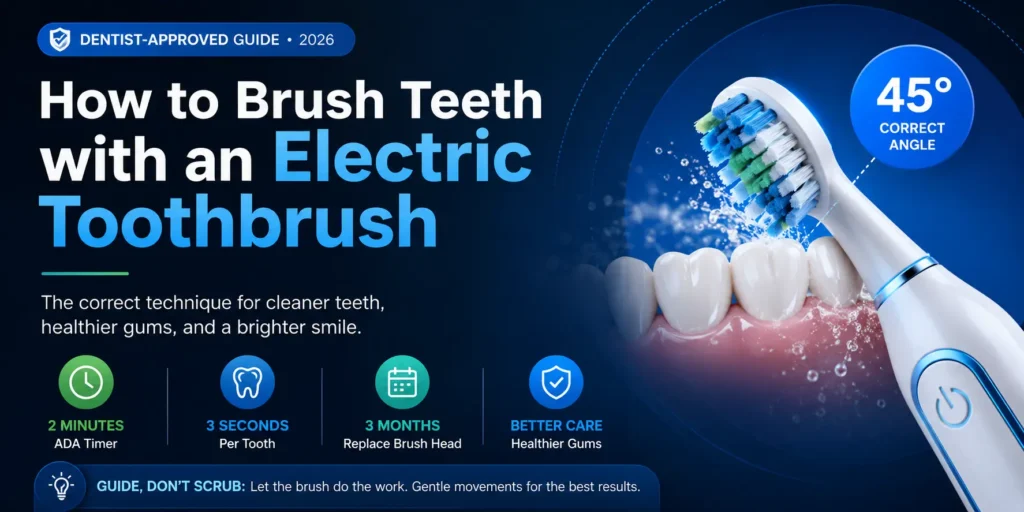
The 45-Degree Angle Rule
Positioning the brush at 45 degrees to the gum line directs the mechanical action of the bristle tips precisely into the sulcus — the small gap between the base of your tooth and the gum tissue. Furthermore, this is exactly where plaque accumulates most rapidly and where it has the most destructive effect on gum health.
At 90 degrees (straight onto the flat face of the tooth), the bristles clean the tooth surface but miss the gum line entirely. Additionally, at 0 degrees (parallel to the gum), the bristles run along the gum without penetrating the sulcus at all. Consequently, the 45-degree position is a specific mechanical optimum — not an approximation.
For oscillating brush heads (Oral-B round heads), tilt the handle slightly toward the tooth you are working on. Furthermore, for sonic brush heads (Sonicare, AquaSonic oval heads), the same 45-degree angle applies but the head shape naturally covers a larger surface area per positioning.
How Much Pressure Is Correct?
The correct brushing pressure is approximately 150 grams — roughly equivalent to resting a medium orange on the brush head without pushing down further. Furthermore, in practical terms, this feels almost uncomfortably light when you first try it — most adults have spent years applying 300 to 500 grams of pressure with a manual brush.
The clearest real-world sign you are pressing too hard: your bristles splay visibly outward within six weeks of installing a new brush head. Furthermore, that outward splaying reduces cleaning contact by 30 to 50 percent — meaning a hard-pressed brush is actually cleaning significantly worse than a lightly pressed one.
Moreover, if your electric toothbrush has a pressure sensor — models like the Philips Sonicare 4100 and Oral-B iO Series 3 both include one — trust the sensor completely. Consequently, when the warning light activates, immediately lift the brush slightly and redistribute contact across a wider surface.
Timing - How to Brush with an Electric Toothbrush
The dentist-recommended brushing time is exactly 2 minutes — twice daily. Furthermore, this figure is based on clinical research showing that two minutes is the minimum time needed to cover all tooth surfaces at a correct 3-seconds-per-tooth pace. Consequently, brushing for less than 2 minutes leaves plaque on some tooth surfaces every single session.
0 to 45 Seconds
What most adults actually do without a timer. Furthermore, 45 seconds is not enough to cover more than half your tooth surfaces at a proper pace. Consequently, inner surfaces and back molars are almost never reached.
1 to 1:30 Minutes
Better than 45 seconds but still inadequate. Furthermore, 90 seconds covers most visible tooth surfaces but consistently misses inner surfaces and gum line detail on back molars. Consequently, plaque builds daily in those areas.
2 Minutes ✅
The ADA minimum. Furthermore, 2 minutes at a 3-second pace covers all 8 tooth surfaces in each quadrant with 30 seconds per quadrant. Consequently, this is the minimum standard for comprehensive plaque removal.
2:30 to 3 Minutes
Beneficial for adults with gingivitis, gum disease, orthodontic appliances, or implants. Furthermore, the extra 30 to 60 seconds allows additional dwell time on problem areas like the gum line and around brackets.
Sonic vs Oscillating Toothbrush Technique: What Is Different?
The core 8-step method applies to both brush types. Furthermore, there are specific technique differences between sonic and oscillating models that produce better results when applied correctly — here is what to know for each.
Oscillating Brush Technique (Oral-B)
The round head of an oscillating brush (Oral-B Pro 1000, iO Series 3) is designed to cup one tooth at a time in its curved edge. Furthermore, correct technique for a round head means positioning the brush so the edge sits slightly on the gum and slightly on the tooth simultaneously — not flat across the face of the tooth.
Consequently, use a tooth-by-tooth approach rather than sweeping across multiple teeth. Place the head, count 3 seconds, slide to the adjacent tooth. Moreover, the handle angle is approximately 45 degrees — but tilt the head slightly toward the gum line to maximize the sweeping action at the plaque accumulation zone.
Additionally, for the inner surfaces of lower front teeth, tilt the handle to a more vertical position and use the tip of the round head to work the gum line.
Sonic Brush Technique (Sonicare / AquaSonic)
Sonic brush heads (Philips Sonicare 4100, AquaSonic Black Series) are oval-shaped and cover slightly more tooth surface per positioning than oscillating round heads. Furthermore, this means you can move slightly faster between teeth — approximately 2 to 3 seconds per surface — while still achieving full mechanical coverage.
The key technique difference for sonic brushes is that the fluid dynamics cleaning effect works slightly beyond where the bristles physically contact. Consequently, maintaining consistent light contact and a steady 45-degree angle is even more important — the hydrodynamic action only works when bristle-generated fluid flow is directed correctly toward the gum sulcus.
Moreover, many sonic brushes include a Sensitive mode running at reduced VPM. Additionally, using Sensitive mode for the first two weeks of switching to electric brushing allows gum tissue to adapt.
Electric Toothbrush Technique for Gum Health and How to Replace Brush Heads
Correct technique protects your gum tissue — but only when combined with timely brush head replacement. Furthermore, both elements work together: the right motion with the right pressure on a fresh brush head produces measurably better gum health outcomes than either element alone.
When to Replace Your Electric Toothbrush Head
syedshoppe.com · 2026
Step-by-Step: How to Replace Electric Toothbrush Head (All Brands)
- Hold the handle firmly in one hand and grip the old brush head between the thumb and forefinger of your other hand
- Pull the old head straight off — no twisting required for most models (Oral-B, Sonicare, AquaSonic all use a straight pull-off design)
- Dispose of the old head — do not attempt to clean and reuse a worn head, as splayed bristles clean less effectively regardless of sanitisation
- Push the new brush head straight onto the drive shaft until it clicks firmly into place — a loose head that wobbles is not properly seated
- Run the brush head under water for 3 seconds to rinse any packaging residue before your first use of the new head
How to Brush Teeth With an Electric Toothbrush and Braces
When learning how to brush teeth with an electric toothbrush while wearing braces, proper technique is essential. An electric toothbrush can remove plaque more effectively around brackets and wires than a manual brush. However, it must be used carefully to protect orthodontic appliances. Furthermore, sonic toothbrushes are often preferred because their fluid-action cleaning helps reach around brackets and wires without requiring direct contact with every bracket.
Step-by-Step Technique for Braces
- Use a sonic electric toothbrush set to Sensitive mode — the gentler vibration frequency is less likely to loosen bracket bonds with extended daily use
- Position the brush head above the bracket at 45 degrees to the gum line and clean the gum-facing surface of each tooth before moving to the bracket itself
- Angle the head directly at the bracket and let the brush dwell for 3 to 4 seconds. The vibration dislodges food particles trapped behind the bracket wire
- Reposition below the bracket at a downward 45 degrees and clean the chewing-surface-facing side of each tooth
- Floss between every bracket and wire after brushing. Electric toothbrush technique alone cannot remove interdental plaque between brackets
- Replace brush heads every 6 to 8 weeks rather than 3 months. Brackets accelerate bristle wear significantly and worn bristles clean far less effectively around wires
How to Clean Your Electric Toothbrush Properly After Every Use
A clean electric toothbrush performs better and carries significantly fewer bacteria than one that is not maintained. Furthermore, toothpaste residue, mineral deposits, and oral bacteria all accumulate on the brush head and handle connection point — and consequently affect both hygiene and motor performance over time.
🔄 AFTER EVERY BRUSHING SESSION
- Hold the running brush head under clean water for 10 full seconds immediately after use — while the motor is still vibrating to shake out trapped paste
- Remove the brush head from the handle and rinse the connection point separately. Paste residue accumulates there and can interfere with the secure head attachment over time
- Shake off excess water gently and store upright in a holder that allows air circulation around the bristles. Damp bristles stored enclosed develop bacterial growth faster
- Furthermore, never share a brush head between two people — brush heads accumulate bacteria that cross-contaminate between users even after rinsing
📅 WEEKLY AND MONTHLY CARE
- Weekly: wipe the handle shaft above the charging base with a damp cloth. Mineral deposits build up on the connection point and can cause the head to fit loosely
- Weekly: rinse the charging base under warm water and dry completely. Toothpaste residue on charging contacts can reduce charging efficiency
- Monthly: soak the brush head in mouthwash or diluted white vinegar (1:4 with water) for 10 minutes. This sanitises bristles and dissolves mineral deposits
- Additionally, replace your brush head every 3 months regardless of how clean the head appears. Worn bristle tips are not visible until significant cleaning capacity has already been lost
- Furthermore, if your brush develops a persistent odor despite regular rinsing, replace the brush head immediately. This indicates bacterial colonisation of the bristle base
How to Charge an Electric Toothbrush Correctly
Most electric toothbrushes use inductive wireless charging — meaning the handle sits on a charging base without any physical connector. Furthermore, charging correctly extends battery lifespan significantly and ensures the motor runs at full power during every brushing session. Consequently, battery-related performance drops are entirely avoidable with the right charging habits.
When to Charge
Charge your electric toothbrush when the battery indicator drops to approximately 25% remaining — not before. Furthermore, keeping the brush permanently on the charging base can overcharge older lithium batteries and reduce total lifespan. Consequently, a charge-then-use routine produces better battery longevity. For travel, charge fully before departure rather than relying on remaining capacity.
Full Charge Time
Most electric toothbrushes reach full charge in 12 to 24 hours from empty. Furthermore, the Oral-B Pro 1000 and Philips Sonicare 4100 both fully charge in approximately 12 hours. Additionally, the AquaSonic Black Series reaches full charge in approximately 4 hours — the fastest in the budget category. Consequently, an overnight charge once every 1 to 2 weeks is sufficient for most adults brushing twice daily.
Battery Life Signs
When your electric toothbrush battery is near end-of-life, the motor feels noticeably weaker even when freshly charged. Furthermore, this performance degradation typically occurs after 2 to 3 years of daily use. Additionally, if charging no longer brings the brush to full performance, the most cost-effective solution is replacing the full brush unit rather than attempting battery replacement.
Can an Electric Toothbrush Damage Gums or Enamel?
The short answer is: yes — but only through incorrect technique, not through correct use. Furthermore, clinical research is clear that an electric toothbrush used with the correct pressure and angle produces no greater enamel or gum damage than an equivalent manual toothbrush used correctly. Consequently, the device itself is not the risk — the technique is.
Moreover, the specific damage risks are: gum recession from overbrushing (too much pressure + too frequent contact), and enamel abrasion from hard bristle heads used at high VPM without adequate lubrication. Additionally, both risks are eliminated by the same two habits: using light pressure and using soft replacement heads exclusively.
Common Mistakes When Brushing Teeth With an Electric Toothbrush
A quick-reference summary of every common technique error — and the fix for each one. Furthermore, if you recognise more than two of these in your own brushing routine, correcting them will produce a noticeable improvement in your oral hygiene within two weeks.
Mistakes Correction Table
| Mistake | What Goes Wrong | The Fix |
|---|---|---|
| Scrubbing back and forth | Cancels electric mechanism; misses gum line | Guide slowly, 3 sec per tooth — let motor work |
| Pressing too hard | Causes gum recession over weeks and months | Hold like a pen — ~150g, feather touch only |
| Turning on mid-air | Splatters paste; wastes initial vibration burst | Place on teeth first, then switch on |
| Wetting brush before paste | Dilutes toothpaste — reduces fluoride concentration | Apply paste to dry head — foam builds naturally |
| Rinsing immediately after | Removes fluoride before it can protect enamel | Spit only — wait 30 seconds before any rinse |
| Skipping inner surfaces | Plaque builds on inner face of lower front teeth | Tilt handle vertical for lower front inner surface |
| Not replacing head every 3 months | Splayed bristles lose 30–50% cleaning contact | Set a calendar reminder — replace quarterly |
Frequently Asked Questions — How to Brush Teeth With an Electric Toothbrush
The most common questions adults ask about electric toothbrush technique — answered directly from clinical guidelines and real brushing experience.
How long should I brush my teeth with an electric toothbrush?
Brush for exactly 2 minutes, twice daily. Furthermore, this is the ADA-recommended minimum for comprehensive plaque removal across all tooth surfaces at a correct pace of approximately 3 seconds per tooth surface. Consequently, the built-in 2-minute timer on most electric toothbrushes enforces this standard automatically — and the 30-second quadrant alerts ensure you divide time evenly across all four sections of your mouth.
Should I wet the brush head before applying toothpaste?
No — always apply toothpaste to a dry brush head. Furthermore, wetting the bristles before applying paste dilutes the toothpaste immediately and reduces fluoride concentration on the tooth surface during brushing. Additionally, the foaming action of the toothpaste creates adequate moisture during the brushing session without any pre-wetting. Consequently, a dry-head application produces better fluoride contact with your enamel throughout the brushing cycle.
Is it bad to rinse your mouth right after brushing with an electric toothbrush?
Yes — rinsing immediately after brushing washes away the fluoride in your toothpaste before it can be absorbed into enamel. Furthermore, the ADA and most dental hygienists recommend spitting out excess foam but not rinsing the mouth for at least 30 seconds after brushing. Consequently, even a brief 30-second wait before rinsing measurably improves fluoride retention and enamel protection over time.
Can I damage my gums by using an electric toothbrush?
Yes — but only through overbrushing pressure, not through correct technique. Furthermore, the most common cause of electric toothbrush gum damage is applying too much pressure over many months. Additionally, using a brush without a pressure sensor increases this risk because there is no feedback mechanism to alert you before damage accumulates. Consequently, always choose an electric toothbrush with a pressure sensor, use soft brush heads exclusively, and hold the handle loosely — approximately 150 grams of pressure — throughout every brushing session.
How often should I replace my electric toothbrush head?
Replace your brush head every 3 months — or sooner if the bristles visibly splay outward. Furthermore, the ADA specifically recommends this 3-month cycle for power toothbrush heads. Additionally, if you brush hard, become ill with a respiratory infection, or notice that your bristles are spreading wider than when the head was new, replace the head immediately rather than waiting for the 3-month mark. Consequently, buying replacement heads in multi-packs reduces the per-head cost to approximately $4 to $8 each.
Does brushing with an electric toothbrush help receding gums?
Switching to correct electric toothbrush technique can halt the progression of gum recession caused by overbrushing. Furthermore, a sonic brush in Sensitive mode with a pressure sensor actively prevents the repeated mechanical trauma that causes recession. Moreover, electric toothbrushes also improve plaque removal at the gum line — reducing the bacterial cause of recession from gum disease. Consequently, an electric toothbrush is not a cure for existing recession, but it is the most practical tool for preventing further recession in most adults.
Should I use an electric toothbrush every time or alternate with manual?
Use your electric toothbrush for every brushing session for consistent results. Furthermore, alternating between electric and manual brushing is not more beneficial than using either one consistently — and technique inconsistency between the two brushing styles often results in missed areas. Consequently, commit to one method and apply it consistently every session for measurably better plaque control and gum health.
The Bottom Line: How to Brush Teeth With an Electric Toothbrush the Right Way
Learning how to brush teeth with an electric toothbrush correctly takes less than a week to master — but the improvement in plaque control and gum health continues for as long as you apply it. Furthermore, the core principles never change: 45-degree angle to the gum line, feather-light pressure of approximately 150 grams, 3 seconds per tooth, and a consistent 2-minute session twice daily. Consequently, the investment of attention you make in technique during your first week pays dividends in dental health across years of use.
Moreover, combine correct technique with regular brush head replacement every 3 months, a clean and dry storage position after every use, and a periodic deep clean of the handle connection point — and your electric toothbrush will deliver full clinical performance throughout its entire useable lifespan.
Points to Remember
- 45-degree angle to gum line — targets the sulcus where plaque causes the most damage
- Approximately 150 grams of pressure — feather touch, loosely held handle throughout
- 3 seconds per tooth — let the motor work; guide only, never scrub back and forth
- 2 minutes per session, twice daily — follow the built-in timer for every single brush
- Furthermore, replace brush head every 3 months — or the moment bristles splay outward
- Spit after brushing — wait 30 seconds before rinsing for better fluoride protection
Explore the Full Electric Toothbrush Guide
Last updated: January 2026. This post contains affiliate links. We only recommend products we have independently tested and believe offer genuine value. As an Amazon Associate, Syed Shoppe earns from qualifying purchases.