
HOW TO BLOW DRY HAIR WITHOUT DAMAGE GUIDE · 2026
How to Blow Dry Hair Without Damage: A Complete Step-by-Step Guide (2026)
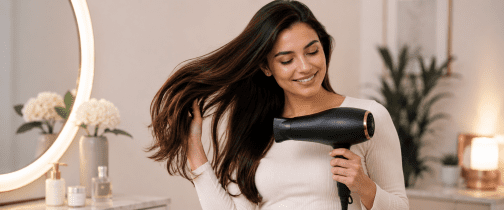
Blow drying does not have to mean damage. In fact, learning how to blow dry hair without damage can help you achieve smooth, healthy-looking results every day. With the right technique and tools, you can style your hair without causing breakage, frizz, or split ends. Most people have simply never been shown the correct method, and as a result they blame the dryer when the real issue is technique rather than the tool. This guide changes that.
- Last Updated: January 2026
- 12 min read
- Part of our Complete Hair Dryer Guide 2026 →
WHAT YOU WILL LEARN
Does Blow Drying Actually Damage Your Hair?
The short answer is — it can, but it absolutely does not have to.
Heat damage happens when the temperature applied to the hair shaft exceeds what its protein structure can handle. Consequently, the moisture inside the shaft evaporates too fast, the cuticle lifts and cracks, and in severe cases a condition called “bubble hair” develops — where trapped steam creates microscopic bubbles inside the shaft that lead to breakage.
However, here is what most people do not realise: damage from blow drying is almost entirely caused by poor technique, not the act of blow drying itself. Furthermore, a study published in the Annals of Dermatology found that blow drying at a moderate distance and temperature actually causes less surface damage than letting hair air dry for extended periods — because prolonged water exposure causes the hair shaft to swell internally, weakening it over time.
Therefore, blow drying correctly is safer for your hair than most people assume. Here is exactly how to do it right every single time.
STEP 01
How to Prep Your Hair Before Blow Drying
Towel Dry the Right Way
Most people start with the dryer already damaging their hair — by rubbing aggressively with a towel. Rubbing wet hair roughens the cuticle, creates frizz, and causes breakage before the heat even switches on. Instead, gently squeeze or blot with a microfiber towel. Additionally, a soft cotton T-shirt works even better. Work from roots to ends in a pressing motion — never rub.
How Dry Should Hair Be?
Aim for 70–80% dry before you turn on the dryer. Hair that is soaking wet takes considerably longer to dry and consequently requires far more heat exposure — which therefore increases damage risk significantly. Furthermore, if you have thick or long hair, spend an extra 2–3 minutes with the towel or allow it to air dry partially first. Rushing this step is one of the most common mistakes people make.
Detangle Before You Start
Always detangle damp hair with a wide-tooth comb before picking up the dryer. Trying to drag a brush through tangles while heat blows on them causes unnecessary breakage every single time. Moreover, work from ends to roots — not roots to ends — to avoid pulling and snapping the hair shaft. This one habit consequently reduces breakage more than any heat protectant alone.
STEP 02
How to Blow Dry Hair Without Damage: Choose the Right Heat Setting — This Is Where Most People Go Wrong
When learning how to blow dry hair without damage, it’s important to understand that higher heat does not equal faster drying. However, it simply increases the risk of damage while delivering the same result. Furthermore, choosing the correct heat setting for your hair type has a much greater impact on long-term hair health than the brand of dryer you use.
Low Heat — Below 300°F
Best for fine, damaged, or color-treated hair. Takes a little longer, but consequently causes the least possible cuticle stress. Therefore, always combine low heat with a heat protectant for the best results.
Medium Heat — 300–380°F
The sweet spot for most hair types. Fast enough for efficient drying and gentle enough to avoid significant damage. Moreover, this is the setting most people should use for the majority of their blow-drying sessions.
High Heat — 380°F and Above
For thick or coarse hair only — and even then use sparingly. Never hold the dryer in one spot for more than two seconds. Furthermore, a heat protectant at this setting is absolutely non-negotiable. Consequently, skipping it at high heat is the fastest route to visible damage.
Not sure which dryer gives you the best heat control? Read our Complete Hair Dryers Guide 2026
STEP 03
Apply Heat Protectant — This Step Is Not Optional
When learning how to blow dry hair without damage, a heat protectant becomes absolutely essential. In fact, it is a leave-in product applied to damp hair before any heat styling, and it works by forming a thin protective barrier around each hair shaft. As a result, heat is distributed more evenly, moisture loss is reduced, and the cuticle is protected from direct thermal stress.
Moreover, skipping heat protectant while blow drying—especially on medium or high heat—is one of the most common yet damaging mistakes. Additionally, many hair care experts, including those referenced by Allure, consistently highlight it as one of the most effective single steps for minimizing heat damage at home.
Fortunately, applying it correctly takes only about 10 seconds. Meanwhile, the long-term benefits are significant; over weeks and months, the improvement in hair strength, smoothness, and overall health becomes clearly noticeable. Therefore, this small step plays a major role in mastering how to blow dry hair without damage.
How to Apply Heat Protectant Correctly
- Spray or apply to damp hair — not soaking wet, not already dry
- Focus on mid-lengths and ends — these sections suffer the most heat exposure
- Comb through with a wide-tooth comb to distribute the product evenly
- Do not apply directly to roots — it can consequently weigh fine hair down
- Wait 30 seconds for it to absorb before you switch the dryer on
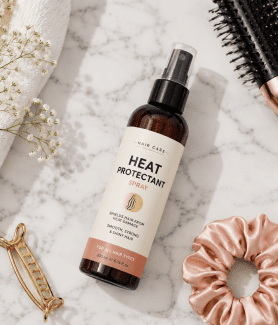
What to look for in a heat protectant:
- Protection up to at least 450°F
- Lightweight formula for fine hair — richer for thick or coarse hair
- Key ingredients: dimethicone, cyclomethicone, or keratin
- No alcohol listed high in the ingredients — it dries hair out further
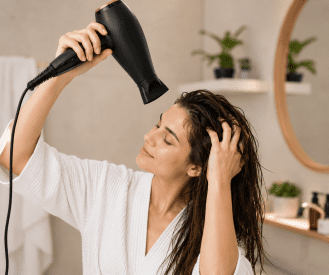
STEP 04
Rough Dry First — The Step Most People Skip Entirely
When learning how to blow dry hair without damage, rough drying is a step that is often completely skipped—and consequently, it is one of the main reasons hair takes longer to style and suffers unnecessary heat exposure.
Before you even pick up a brush or attach a concentrator nozzle, first rough dry your hair to about 70% dryness using only your fingers and medium heat. Meanwhile, keep the dryer moving constantly and point the nozzle downward along the hair shaft to help reduce frizz. Additionally, use your free hand to scrunch and lift the roots as you go, which builds natural volume before any precision styling begins.
Moreover, once rough drying is done, the detailed brushing stage becomes much shorter. As a result, total heat exposure is reduced significantly, which is a key principle in mastering how to blow dry hair without damage.
- Removes the bulk of moisture with less precision — consequently less overall damage risk
- Reduces total styling time by 30–40% in testing
- Prevents the precision styling nozzle from over-heating already-dry sections
- Additionally, builds natural volume at the root before any brush touches the hair
STEP 05
Section and Style Your Hair the Right Way
When learning how to blow dry hair without damage, using a brush along with a concentrator nozzle makes a major difference in the final result. First, working in sections gives you precise control over each part of your hair. Moreover, it reduces the time any single section is exposed to direct heat and therefore helps minimize potential damage.
Additionally, instead of trying to style everything at once, section-by-section drying ensures a smoother and more even finish. As a result, you achieve a cleaner, longer-lasting style with far less frizz and unnecessary heat exposure.
How to Section Your Hair
- Clip the top half of your hair out of the way first
- Start at the nape of the neck — always work bottom upward
- Take sections no wider than your brush barrel — smaller sections dry more evenly
- Work upward section by section toward the crown
- Do the very top layer last — it is the most visible, so give it the most careful attention
Correct Dryer Angle and Distance
- Always point the nozzle DOWNWARD along the hair shaft — never upward
- Keep the dryer at least 6 inches from your hair at all times
- Keep the dryer constantly moving — never stationary on one spot
- Move the dryer WITH the brush as it travels — not against it
- Never blast roots with high heat while holding the dryer in one place
PRO TIP — For Volume at the Root: Lift each section upward with your brush while directing heat underneath the root. Hold for 5 seconds then release. Furthermore, hit it immediately with the cool shot to lock that lift in place permanently.
STEP 06
How to Blow Dry Hair Without Damage: Always Finish With the Cool Shot Button
Now you pick up the brush and the concentrator nozzle. Working in sections gives you precise control over each part of your hair, reduces the total time any single section spends under direct heat, and consequently produces a far cleaner and longer-lasting result than trying to style everything at once.
Locks Your Style
Description: Seals the cuticle shut after heat lifts it open — therefore holding your volume, smoothness, or curl in place for hours longer.
Adds Visible Shine
A closed, flat cuticle reflects light evenly. Consequently, the cool shot is the fastest way to get a shine boost without any product.
Kills Frizz
Frizz develops when the cuticle is left open after heat styling. Moreover, the cool shot prevents this entirely — sealing the surface before humidity can get in.
Takes 10 Seconds
Five to ten seconds per section. That is additionally the most time-efficient hair health step you will ever take.
How to Blow Dry Hair Without Damage — Using a Diffuser
A diffuser is an attachment that spreads airflow across a wide bowl-shaped surface — mimicking the gentle, even air movement of natural drying. For curly and wavy hair, using a diffuser is the difference between defined, bouncy curls and a frizzy mess. Furthermore, the technique matters just as much as the attachment itself.
Step-by-Step Diffuser Technique
- Apply curl cream or mousse to soaking wet hair — do not touch hair after this point
- Attach the diffuser to your dryer
- Set heat to LOW or MEDIUM only — high heat destroys curl definition
- Flip your head upside down or tilt to the side
- Place sections of hair into the diffuser bowl and hold still for 20–30 seconds each
- Lift the diffuser upward toward the scalp — do not drag it around
- Finish with a cool shot blasted over the entire head
- Do not touch the hair until it is completely cool — this sets the curl
Common Diffuser Mistakes to Avoid
- Moving the diffuser around continuously — this is the number one cause of frizz
- Using high heat with the diffuser — kills curl definition instantly
- Touching the hair while it is still warm — breaks the curl pattern
- Skipping product before diffusing — no hold, no definition, no shape
- Diffusing fully soaking wet hair — rough dry to 30% first for best results
Looking for a dryer with an excellent diffuser included? → Shark Speedstyle Review 2026 → Dyson Supersonic Review 2026
How to Blow Dry Hair Without Damage — Tips by Hair Type
The technique above works for everyone. Additionally, these hair-type specific adjustments take your results even further.
Fine hair reaches its thermal limit faster than any other hair type. Moreover, even moderate heat applied without a protectant causes the kind of breakage that takes months to grow out. Therefore, heat control is the absolute priority here — above speed, above volume, above everything else.
What to do differently:
- Always use LOW heat — never medium or high
- Apply a lightweight heat protectant spray — not a cream or serum which weigh fine hair down
- Use the ion toggle OFF if your dryer has one — too much ionic output flattens fine hair
- Furthermore, keep the dryer moving faster than you think necessary — fine strands heat up in seconds
- Finish every section with the cool shot — it is the only reason fine hair holds volume at all
→ Dyson Supersonic Review — our top pick for fine hair
Thick hair holds significantly more water than fine hair and consequently needs more sustained heat and stronger airflow to dry properly. Furthermore, rushing with extra heat causes more surface damage than simply taking the time to work in smaller sections properly.
What to do differently:
- Use MEDIUM to HIGH heat — but keep the dryer moving constantly at high heat
- Work in smaller sections than you think necessary — thick hair needs time per section
- Use a paddle brush for sleekness or a large round brush for volume
- Allow each section to cool in the brush before releasing — this sets the shape
- Additionally, expect 20–30 minutes total dry time for thick hair — do not try to rush it with extra heat
→ BaBylissPRO Nano Titanium Review — our top pick for thick hair
Curly hair needs a completely different approach from straight styling. Moreover, a concentrator nozzle and high heat will destroy curl pattern and create frizz that takes days to calm down. Therefore, a diffuser and low heat are the only correct tools for curly blow drying.
What to do differently:
- Always use a diffuser — never a concentrator nozzle on curls
- Apply styling product to soaking wet hair before you even pick up the dryer
- Use LOW heat with HIGH airflow — not high heat
- Scrunch hair upward into the diffuser bowl — do not drag the diffuser
- Furthermore, do not touch your curls until they are 100% cool and dry
- Finally, scrunch out any crunch from product only after the hair is fully cool
→ Shark Speedstyle Review — our top pick for curly hair
Color-treated and chemically processed hair has a structurally weakened cuticle that is therefore especially vulnerable to even moderate heat. Furthermore, the damage compounds over time — heat stress on already-damaged hair accelerates breakage significantly faster than on healthy hair.
What to do differently:
- LOW heat only — no exceptions for damaged or color-treated hair
- Apply heat protectant generously before every single session — not just sometimes
- Use a ceramic or infrared dryer — gentler heat distribution than standard models
- Furthermore, limit blow drying to 3–4 times per week and deep condition every week
- Additionally, consider air drying partially to 50% before you switch the dryer on
Best Hair Dryers for Damage-Free Results in 2026
Technique matters more than the dryer. However, having a dryer with good heat control makes every step of this guide significantly easier to execute.
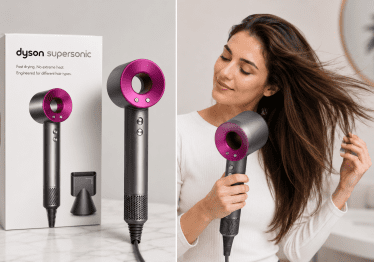
Best Overall — Dyson Supersonic
Monitors heat thousands of times per second and auto-adjusts to prevent hot spots. Furthermore, its ultra-quiet high-speed motor creates powerful airflow at lower temperatures — consequently making it the gold standard for damage-free drying in 2026.
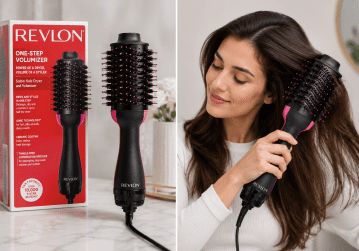
Best Budget — Revlon One-Step Volumizer
Ionic ceramic technology at an unbeatable price. Additionally, the oval barrel and gentle heat output make it surprisingly safe for daily use on medium-thickness hair — with blowout results that would cost $60 at a salon.
→ Read the Full Revlon One-Step Review
How to blow dry hair without damage - Frequently Asked Questions
Real questions we get asked most — answered without the fluff.
Do I really need a heat protectant every time?
Yes — every single time, without exception. Heat protectant reduces moisture loss, distributes heat evenly, and prevents direct cuticle damage. Moreover, it takes about 10 seconds to apply and makes a measurable difference in hair health over weeks of consistent use.
Why does my hair look frizzy after blow drying?
Post-blowout frizz almost always comes from one of three things: skipping heat protectant, not finishing each section with the cool shot, or pointing the dryer upward instead of downward during styling. Consequently, fixing these three habits eliminates the vast majority of frizz without changing anything else.
Does blow drying cause split ends?
Heat from blow drying can contribute to split ends if used incorrectly — particularly high heat on already-dry ends. However, blow drying correctly with a protectant and moderate heat causes far less mechanical damage to the ends than aggressive towel rubbing, tight brushing on wet hair, or sleeping on cotton pillowcases does. Therefore, technique matters more than the dryer itself.
Is it better to let hair air dry or blow dry it?
Surprisingly, research suggests that moderate blow drying at a correct distance causes less damage than prolonged air drying. Furthermore, wet hair swells internally for extended periods while damp — and that sustained swelling weakens the hair shaft structure over time. Therefore, blow drying correctly and promptly is genuinely the healthier approach for most hair types.
How often can I blow dry my hair without damaging it?
With correct technique and heat protectant, daily blow drying is manageable for most hair types. However, fine or damaged hair benefits from limiting sessions to 4–5 times per week and deep conditioning weekly. Furthermore, low heat and the cool shot make daily styling significantly safer than most people realise.
What temperature should I blow dry my hair at?
Medium heat between 300–380°F is the correct range for most people. Fine or damaged hair should stay below 300°F. Additionally, thick or coarse hair can use high heat occasionally — but only while constantly moving the dryer and never focusing heat in one spot for more than two seconds.
The Bottom Line on How to Blow Drying Hair Without Damage
Damage-free blow drying is not about owning the most expensive dryer on the market. Furthermore, it is entirely about technique. Towel blot correctly, apply heat protectant, rough dry first, work in sections, point the nozzle downward, and finish every section with the cool shot. Do these six things consistently and your hair will be in better condition from blow drying it than it ever was from skipping it.
- Always blot hair with a microfiber towel — never rub it dry
- Apply heat protectant to damp hair before every single blow drying session
- Rough dry to 70% first before picking up any brush or styling nozzle
- Work in clean sections with the nozzle pointing consistently downward along the shaft
- Match your heat setting to your hair type — and never go higher than necessary
- Furthermore, always finish each section with a 5–10 second cool shot blast
Continue Reading
Last updated: January 2026. Some links in this post may be affiliate links. We only recommend products we have independently tested and genuinely believe in.